Following on from my previous airbrushing post, more airbrush fun and frustration, this time with a helicopter.
I picked up the crashed Blackhawk helicopter from Britannia Miniatures at Claymore 2012. I'm planning to use it for post apocalypse games, so I wanted to make it look like it had been in the ground for a while, rather than just freshly crashed. Having (hopefully) learned a few lessons from the Ainsty Crawlers and Sherman Tanks, and having just finished watching the Miniature Mentor weathering video, my plan was:
- prime with black (spray can)
- put on a basecoat of dark red/orange (airbrush)
- seal the basecoat with Humbrol gloss varnish (airbrush)
- apply AK Productions Heavy Chipping solution (airbrush)
- put on the main colour for the helicopter (airbrush)
- use an old and stiff brush soaked in water to activate the chipping solution, lifting chunks of the main colour away, revealing the read/orange basecoat
- weather
- highlight
The first few parts of this went off without any great problems. I left the model overnight after applying the varnish, and the chipping solution worked very well to give me a faded look I was happy with. Given that the helicopter body isn't metal (I assume it's aluminium), heavy rusting wouldn't have been appropriate, but it looks nicely worn.
The walls and ground were airbrushed, shaded and highlighted without incident, although I'm not crazy about the colour of the wall.
The weathering of the helicopter went fairly well. I used AK Productions Brown Wash for Green Vehicles for shading, and while it was very subtle, it did make a difference.
I decided to make the windows look dusty, rather than reflective, so I washed thinned down Testor's Dust over them using a flat brush. One layer looked a bit too thin, so I applied a second wash. Sadly, this went on far too thick, and the windows looked white, rather than streaky. I tried a wash of Badab Black to tone it down, but that had no effect. Glazing it with black paint, however, knocked it back enough to satisfy me.
The real problems started when I decided to apply a final filter (check me out, using vehicle modelling words like I know what they mean :-)) over the top surfaces, to lighten them up a bit.
I had brought some of my old enamel paints down from my loft. Up until a few years ago I painted primarily with enamels, so they are still reasonably fresh. I made a wash with a green and some Humbrol Enamel Thinners. It went on without a problem, but when it dried the surface was covered with light green splotches. I'm not sure what happened; my best guess is that bits of pigment solidified out when the thinner evaporated. (I should have taken some pictures at this point, but my first thought was not "let's get the camera" - it was rather ruder than that.)
I decided to try and knock the spots back by applying Vallejo Green Wash. However, when this dried there were a lot more green spots. Again, no idea why, possibly matt medium issues again(*) (I did shake the wash, but possibly not long enough)
At this point the surface looked dreadful, so I decided to brush paint over the affected areas with the original Tamiya J.A Green, lightened very slightly with Tamiya light blue. When it dried, however, the areas I'd painted were very obvious - although at least the spots had gone.
I remembered that the chipping solution still seemed to be active (it had caused problems when I was doing the streaks on the windows), so I dampened the light areas and attacked them with the stippling brush. This did the trick, and the light areas finally blended in. There was one small area that was a bit shiny, but I applied the brown enamel wash and that fixed it.
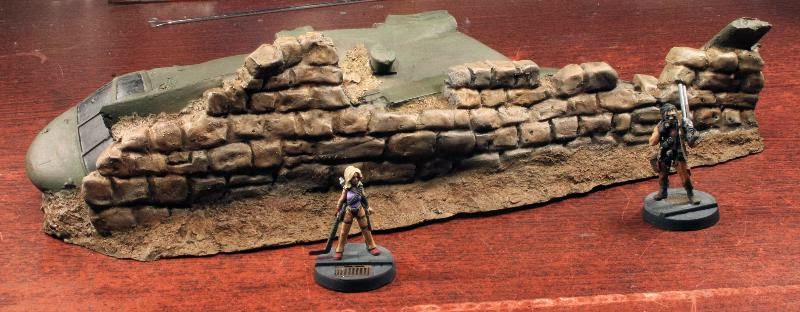
It didn't seem wise to try and do any more, so I decided to call it quits. The end result is shown below with a Hasslefree and some other figure whose manufacturer I don't remember.

I'm currently working on a couple of HUMVEEs, which are progressing without too much incident. I'm trying to muddy them up, but no matter how much brown wash and burnt umber oil paint I apply, they just don't seem to be taking the hint...
* I had similar problems with Nuln Oil and Hasslefree's hazmat figures. I have used Nuln Oil once since then, and despite shaking it for more than a minute, it still left white marks in creases. I'm going to ditch the bottle and try a new one.