Finally finished my Hasslefree post apocalypse not-Scooby gang, so thought I'd post up some pictures.
I got these for Christmas 2012 and have been wanting to paint them since I opened the box. There's a lot of jealous lead in the lead mountain, as these have skipped the queue big time.
I picked up the Season 1 and 2 DVD of the show, partly for reference and partly for nostalgia. I watched the first episode, and it was good fun - I'd even forgotten who the villain was. However, the laugh track that was randomly inserted throughout the whole episode has put me off sufficiently that I've yet to watch another one.
I took some screen captures and fed them into the Reaper Power Palette. Given that I have very few Reaper paints, I then looked for conversions to Vallejo. I found only a few direct conversions, and most of those paints weren't ones that I could find at Vallejo stockists. As a result, most of the colours below are my own best guesses.
Anyways, enough preamble...
I should apologise in advance for some of the eyes below. I'm not quite sure what happened, but Shaggy and Daphne seem to have mad "Frazer"(*) eyes.
Barney (Fred)
Probably the simplest of the figures to paint. I'm quite happy with the white, as it's usually a colour I struggle with.
I wasn't happy with the blending I was getting on his trousers, so I went looking for some other approaches. The one I found that seemed to suit my painting style best was two brush blending. The link there is to Studio McVey, but there are plenty of videos on YouTube as well. I really wish I'd found this method before shading and highlighting the skin, as I think it makes quite a difference to the outcome of the figure. I shall be using this approach a lot on future figures.


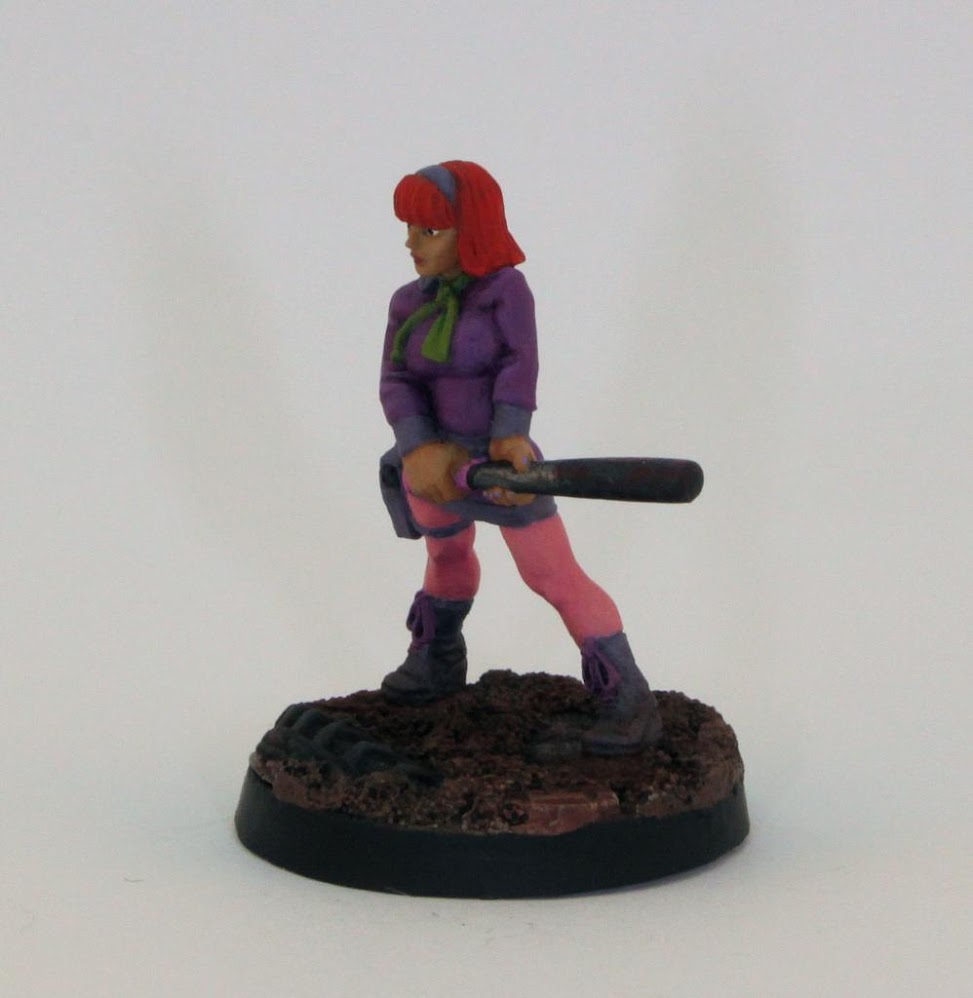
Felicity (Daphne)
I had a couple of problems on this figure. The bands on her dress are too dark, even though the colour I used (Citadel Base Daemonette Hide) looked like a good solid match. Once on the figure, however, it looked more grey than purple. Personally, I'm blaming the apocalypse for muting colours.
The other difficult area, colour-wise, was her tights, which I painted three times before I found a colour that matched my references. Some pictures showed them purple, while others showed them pink. In the end I went with light pink (Vallejo Old Rose), which was a good match with the DVD cover picture.


Wolsey (Shaggy)
The biggest problem with this figure was trying to get the highlights on the olive drab webbing to actually show against the base colour. It's still not very visible, although I did spend quite a bit of time on it.


Hamlet (Scooby)
I carefully mixed up the basecoat colour for this, and I was reasonably happy with it. I was somewhat less happy when I found much later that I already had a Vallejo paint the exact same colour. I did some research on what colour his claws should be (I dread to think what ads Google's going to show me based on some of the searches I've been doing for this and other projects lately). It turns out that Scooby is a brindle Great Dane, so his claws should be black. I also found out that dog owners take their hobby very very seriously - the amount of information I found on dog claws was, frankly, scary.
I did practise writing "SD" on some plasticard, to see if I could get it onto his dog tag. I was using a 0.05mm technical pen, and it would have been possible, but I decided it wasn't worth the risk. Apart from anything else, the DVD cover shows the writing in brass, and that wouldn't have been visible at that size against the green. Even the black of the pen would have looked like a smudge unless under a magnifying glass.
While looking at the photos, I noticed that his left ear looked a bit chipped, so I have fixed that. Personally, I blame the apocalypse for chipping perfectly good paint.


Louise (Velma)
My favourite figure of the bunch, and probably one of my top ten all-time favourite miniatures. The pose and attitude put into 28mm of metal is quite amazing, and it was a joy to paint (although I could have done without the very thin straps on her top - those were a real pain to paint. It's also worth not getting me starting on the fingerless gloves, which are just plain mean on the sculptor's part). I noticed in the photographs that her right night vision goggle looked chipped, so I fixed that at the same time as Scooby's ear.
Her skirt was one of the few colour matches that I had the Vallejo equivalent for. Despite this, I painted it in a completely different colour - much more brown than red. I thought I'd be able to highlight up to red on it, but when I got to the shading and highlighting stage, I decided to repaint the whole thing in the correct colour.
I did quite a lot of gore on her chainsaw, then realised I didn't want to carry the gore over onto the figure. I glazed over most of it, so hopefully it just looks like a well used chainsaw, rather than a chainsaw that's in the middle of being used.


The Gang
I wanted to use different bases for each figure, but didn't have five variants. There was a possibility that poor Velma was going to be a fifth wheel, base wise, so I decided to use the same base on them all, just in different positions.
I am busy converting a van for them. It's based on the Ainsty SWAT van, so it's not particularly close to the original. I figure, however, that they traded up when the apocalypse happened. The conversion is largely finished, but I need to practise with my airbrush before I attempt to paint it. To that end I'm busy painting some vehicles at the moment but, hopefully, it won't be too long before I start on the van.

I tried a new setup when I photographed these figures. My previous layout had two lamps overhead, and was quite harsh. I picked up a couple of cheap desk lamps (the kind with bendy necks), which I can position from the side, giving more even light coverage across the figure. I also dug out my old photo light cube tent thing. In was too dark with the lights only from above, but the ones from the side make it usable again, and the tent diffuses the light, making it softer. Hopefully the pictures are better than my old approach, only time will tell.
(*) Google Dad's army private Frazer and you'll see what I mean.
No comments:
Post a Comment